
2023.07.09 기준으로 업데이트 되었습니다.
Staging 개발 환경의 필요성
1인 개발을 하는 입장에서 Local, Production 이 두가지 환경이면 개발/배포하기에 충분합니다.
다만,,, 서비스의 규모가 성장하는 경우 한계에 부딪힙니다. 신규 기능을 개발하는 과정을 Production에서 진행할 경우 유저에게 영향을 줄 수 있습니다. 심각한 경우 테스트 데이터가 운영 환경에 적재되고 데이터가 꼬이는 경우 돌이킬 수 없는 상황까지 올 수 있습니다.
운영환경이 분리되지 않아 발생하는 문제 중 쉽게 볼 수 있는건 Push 테스트입니다. 아마도 아래 이미지와 같은 Push를 받아본 적 있으실겁니다.


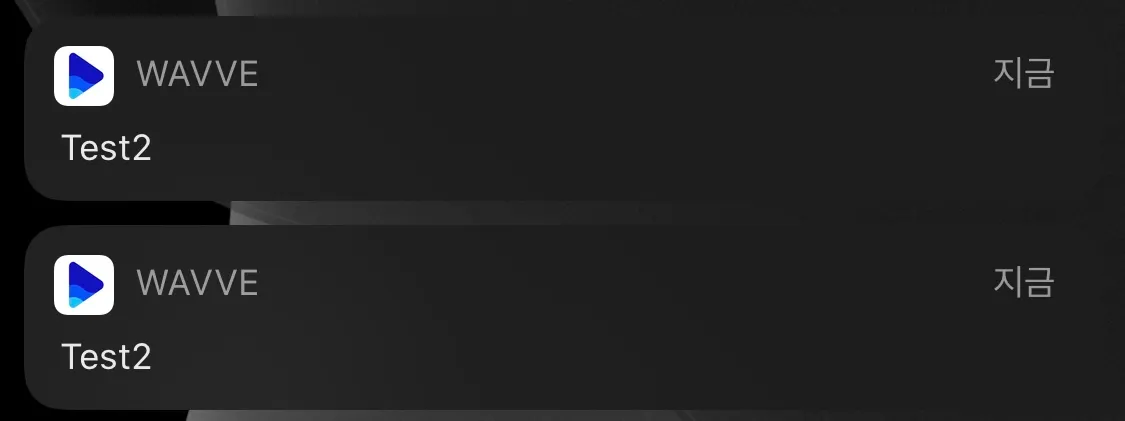
Push 테스트하는 개발자, 기획자 화이팅 
Staging 환경의 Firebase Project생성
^ 위 두개의 포스팅을 먼저 읽어두는게 좋습니다.
Staging 환경의 Firebase Project를 생성하는 방법은 이미 너무 많은 좋은 글들이 있어서 링크로 대체합니다.
이후 Authentication, Firestore, Firestore 기능을 활성화 시켜주세요.
[Firebase Cloud function] Staging 배포 환경 설정
서비스계정 파일 추가
firebase > 프로젝트 설정 > 서비스 계정 > 비공개 키 추가
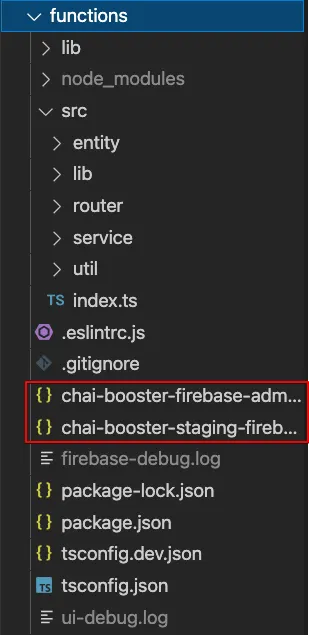
프로젝트에 기존 Production 에서 사용하던 json 파일이 하나 있는데, 그 위치에 staging 을 위한 firebase 서비스 계정 비공개 키를 추가합니다.
functions 코드
import * as functions from "firebase-functions";
import * as express from "express";
import * as admin from "firebase-admin";
const productionServiceAccount = require("../../trend-pick-e7679-firebase-adminsdk-d8xth-874d44e941.json"); 👈👈👈👈👈👈👈 production의 serviceAccount
const stagingServiceAccount = require("../../trend-pick-staging-firebase-adminsdk-fvorv-fa48104e23.json"); 👈👈👈👈👈👈👈 staging의 serviceAccount
var IS_STAGING = true; 👈👈👈👈👈👈👈 이걸로 어떤 Firebase를 바라볼 지 결정할겁니다.
const serviceAccount = IS_STAGING ? stagingServiceAccount : productionServiceAccount;
admin.initializeApp({ credential: admin.credential.cert(serviceAccount) });
const firestore = admin.firestore();
import cors = require('cors');
Dart
복사
Cloud functions를 초기화 하는 단계에서 어떤 서비스 계정에서 서비스할지 결정합니다.
아래 github action 자동 배포 단계에서 IS_STAGING 값을 변경함으로써 환경에 맞는 서비스를 배포합니다.
staging 배포 단계 추가
•
{firebase project root}/githubs/workflows/staging_functions_deploy.yaml
name: "[Staging] functions deploy"
on:
push:
branches:
- develop
jobs:
deploy:
name: Deploy
runs-on: ubuntu-latest
steps:
- name: Checkout Repo
uses: actions/checkout@main
- name: Install Dependency
run: npm install
working-directory: ./functions
- name: Deploy
uses: w9jds/firebase-action@master
with:
args: deploy --only functions
env:
FIREBASE_TOKEN: ${{ secrets.FIREBASE_TOKEN }}
PROJECT_ID: trend-pick-staging
YAML
복사
•
{firebase project root}/githubs/workflows/production_functions_deploy.yaml
name: "[Production] functions deploy"
on:
push:
branches:
- main 👈👈👈👈👈
jobs:
deploy:
name: Deploy
runs-on: ubuntu-latest
steps:
- name: Checkout Repo
uses: actions/checkout@main
- name: Install Dependency
run: npm install
working-directory: ./functions
- name: Select Environment 👈👈👈👈👈 Production 환경으로 변경
uses: jacobtomlinson/gha-find-replace@master
with:
find: "var IS_STAGING = true"
replace: "var IS_STAGING = true"
include: "./lib/envrionment.ts"
- name: Deploy
uses: w9jds/firebase-action@master
with:
args: deploy --only functions
env:
FIREBASE_TOKEN: ${{ secrets.FIREBASE_TOKEN }}
PROJECT_ID: trend-pick-e7679 👈👈👈👈👈 Firebase ID 변경
YAML
복사
Staging과 Production workflow 파일에서 차이가 나야 하는 부분을 체크했습니다.
앞으로의 functions 신규 기능 개발/테스트는 이런 Flow로 진행됩니다.
1.
Local 환경에서 emulator를 통한 테스트
2.
Staging 환경에서 실기기 테스트
3.
Production 환경 배포
Firebase 2개를 효율적으로 사용하는 방법
1개의 Cloud Functions 코드를 2개의 Firebase에 연결해서 사용해야 합니다. Github Action 에서는 배포단계에서 PROJECT_ID 를 통해 어떤 Firebase로 배포할지 결정합니다.
로컬에서는 {firebase directory}/.firebaserc 파일을 수정합니다
{
"projects": {
"staging": "trend-pick-staging",
"default": "trend-pick-staging",
"prod": "trend-pick-production"
}
}
JSON
복사
projects 하위에 사용할 firebase project를 입력합니다. alias가 key, project id가 value 입니다.
firebase use staging // "trend-pick-staging" 프로젝트에 연결
firebase use prod // "trend-pick-production" 프로젝트에 연결
Bash
복사
[Client] Flutter에 Staging 환경분리 적용
Flutter Project
'Flutter 환경 분리' 포스팅에서 Constants.dart 파일을 만들고 환경에 따라서 다르게 사용할 변수들을 추가했었습니다. 여기에 Staging 을 추가합니다.
enum Environment { LOCAL, STAGING, PROD } 👈👈👈👈👈👈 Staging이 추가됩니다
Dart
복사
그리고 추가된 Environment에 따라서 IS_DEBUG, API host 등 필요 변수들을 정의합니다.
Constants.dart
import 'package:flutter/material.dart';
class ServiceColors {
static Color get mainThemeBlueColor => Color(0xff1941a3);
}
enum Environment { LOCAL, STAGING, PROD }
class Constants {
static Map<String, dynamic> _config = _Config.stagingConstants;
static const String _envrionment = String.fromEnvironment(
'ENVIRONMENT',
defaultValue: 'STAGING',
);
static void initialize() {
switch (Constants._envrionment) {
case "LOCAL":
_config = _Config.localConstants;
break;
case "STAGING":
_config = _Config.stagingConstants;
break;
case "PRODUCTION":
_config = _Config.prodConstants;
break;
default:
_config = _Config.stagingConstants;
}
}
static get API_HOST {
return _config[_Config.API];
}
static get IS_STAGING {
return _config[_Config.IS_STAGING];
}
}
class _Config {
static const API = "API";
static const IS_STAGING = "IS_STAGING";
static Map<String, dynamic> localConstants = {
API: "http://127.0.0.1:5001/trend-pick-staging/asia-northeast3/api",
IS_STAGING: true,
};
static Map<String, dynamic> stagingConstants = {
API: "https://asia-northeast3-trend-pick-staging.cloudfunctions.net/api",
IS_STAGING: true,
};
static Map<String, dynamic> prodConstants = {
API: "https://asia-northeast3-trend-pick-production.cloudfunctions.net/api",
IS_STAGING: false,
};
}
Dart
복사
firebase_options.dart
import 'package:firebase_core/firebase_core.dart' show FirebaseOptions;
import 'package:flutter/foundation.dart'
show defaultTargetPlatform, kIsWeb, TargetPlatform;
import 'package:trend_pick_flutter/common/Constants.dart';
class DefaultFirebaseOptions {
static String get firebaseName {
if (Constants.IS_STAGING) {
return "trends-pick-staging";
} else {
return "trends-pick-production";
}
}
static FirebaseOptions get currentPlatform {
if (kIsWeb) {
throw UnsupportedError(
'DefaultFirebaseOptions have not been configured for web - '
'you can reconfigure this by running the FlutterFire CLI again.',
);
}
switch (defaultTargetPlatform) {
case TargetPlatform.android:
if (Constants.IS_STAGING) {
if (kReleaseMode) {
return androidReleaseStaging;
} else {
return androidDebugStaging;
}
} else {
if (kReleaseMode) {
return androidReleaseProduction;
} else {
return androidDebugProduction;
}
}
case TargetPlatform.iOS:
if (Constants.IS_STAGING) {
if (kReleaseMode) {
return ioReleaseStaging;
} else {
return iosDebugStaging;
}
} else {
if (kReleaseMode) {
return iosReleaseProduction;
} else {
return iosDebugProduction;
}
}
default:
throw UnsupportedError(
'DefaultFirebaseOptions are not supported for this platform.',
);
}
}
static const FirebaseOptions androidDebugStaging = FirebaseOptions(
apiKey: '-',
appId: '-',
messagingSenderId: '-',
projectId: '-',
storageBucket: '-',
);
static const FirebaseOptions androidDebugProduction = FirebaseOptions(
apiKey: '-',
appId: '-',
messagingSenderId: '-',
projectId: '-',
storageBucket: '-',
);
static const FirebaseOptions androidReleaseStaging = FirebaseOptions(
apiKey: '-',
appId: '-',
messagingSenderId: '-',
projectId: '-',
storageBucket: '-',
);
static const FirebaseOptions androidReleaseProduction = FirebaseOptions(
apiKey: '-',
appId: '-',
messagingSenderId: '-',
projectId: '-',
storageBucket: '-',
);
static const FirebaseOptions iosDebugStaging = FirebaseOptions(
apiKey: '-',
appId: '-',
messagingSenderId: '-',
projectId: '-',
storageBucket: '-',
iosClientId: '-',
iosBundleId: '-',
);
static const FirebaseOptions iosDebugProduction = FirebaseOptions(
apiKey: '-',
appId: '-',
messagingSenderId: '-',
projectId: '-',
storageBucket: '-',
iosClientId: '-',
iosBundleId: '-',
);
static const FirebaseOptions iosReleaseStaging = FirebaseOptions(
apiKey: '-',
appId: '-',
messagingSenderId: '-',
projectId: '-',
storageBucket: '-',
iosClientId: '-',
iosBundleId: '-',
);
static const FirebaseOptions iosReleaseProduction = FirebaseOptions(
apiKey: '-',
appId: '-',
messagingSenderId: '-',
projectId: '-',
storageBucket: '-',
iosClientId: '-',
iosBundleId: '-',
);
}
Dart
복사
현재 앱의 환경과 빌드 타입에 따라서 사용할 Firebase Option을 선택하도록 합니다.
Flutter Build Configurations 수정
build configuration 분리
1.
main_staging
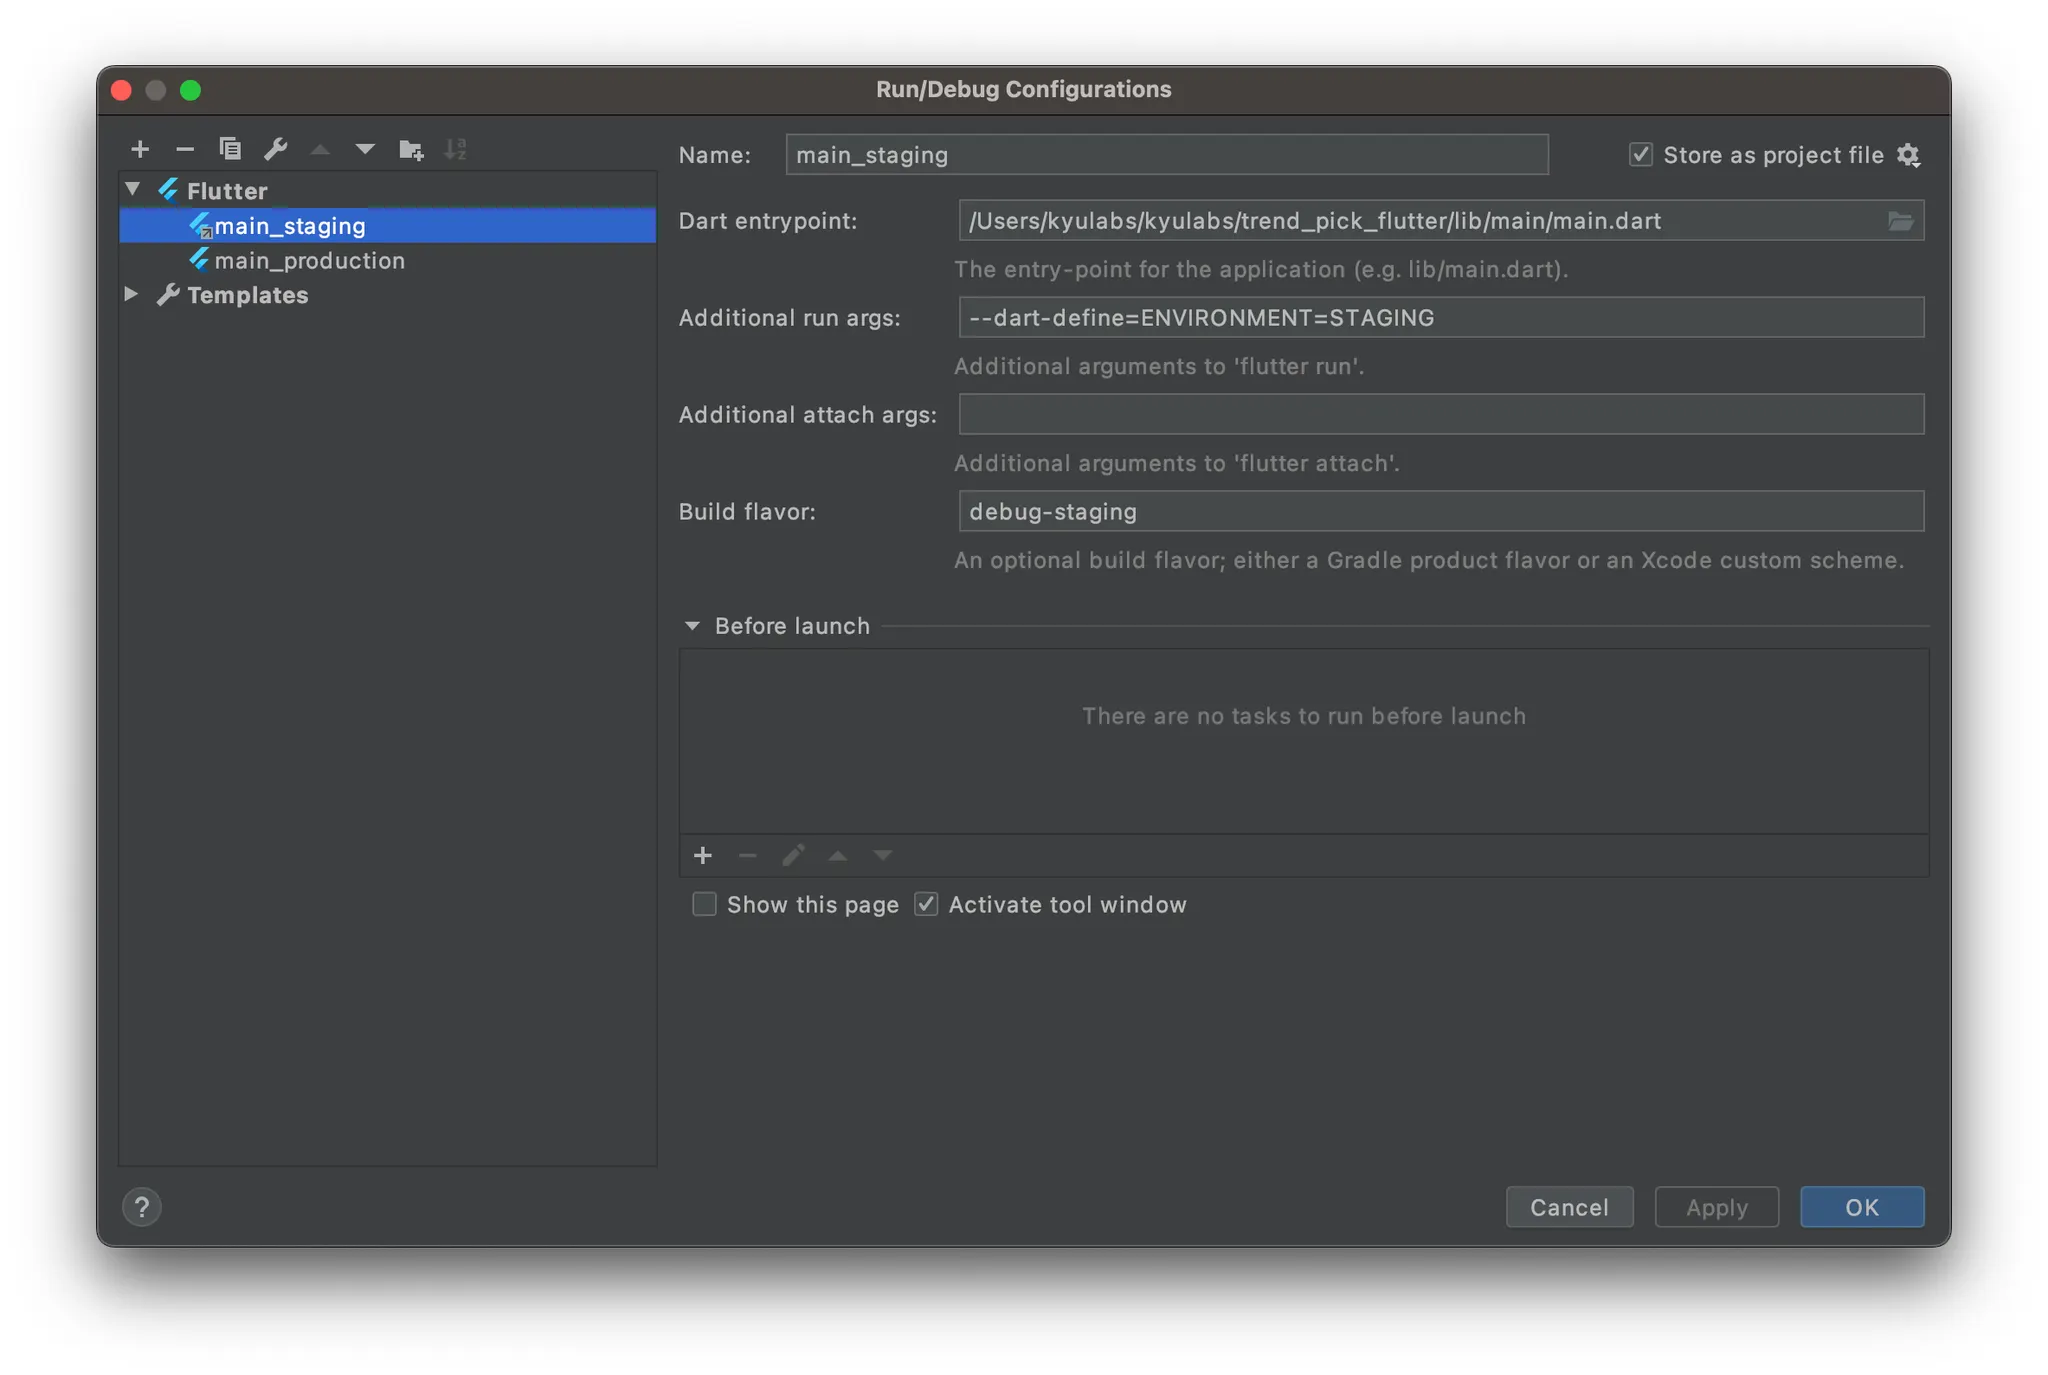
2.
main_production
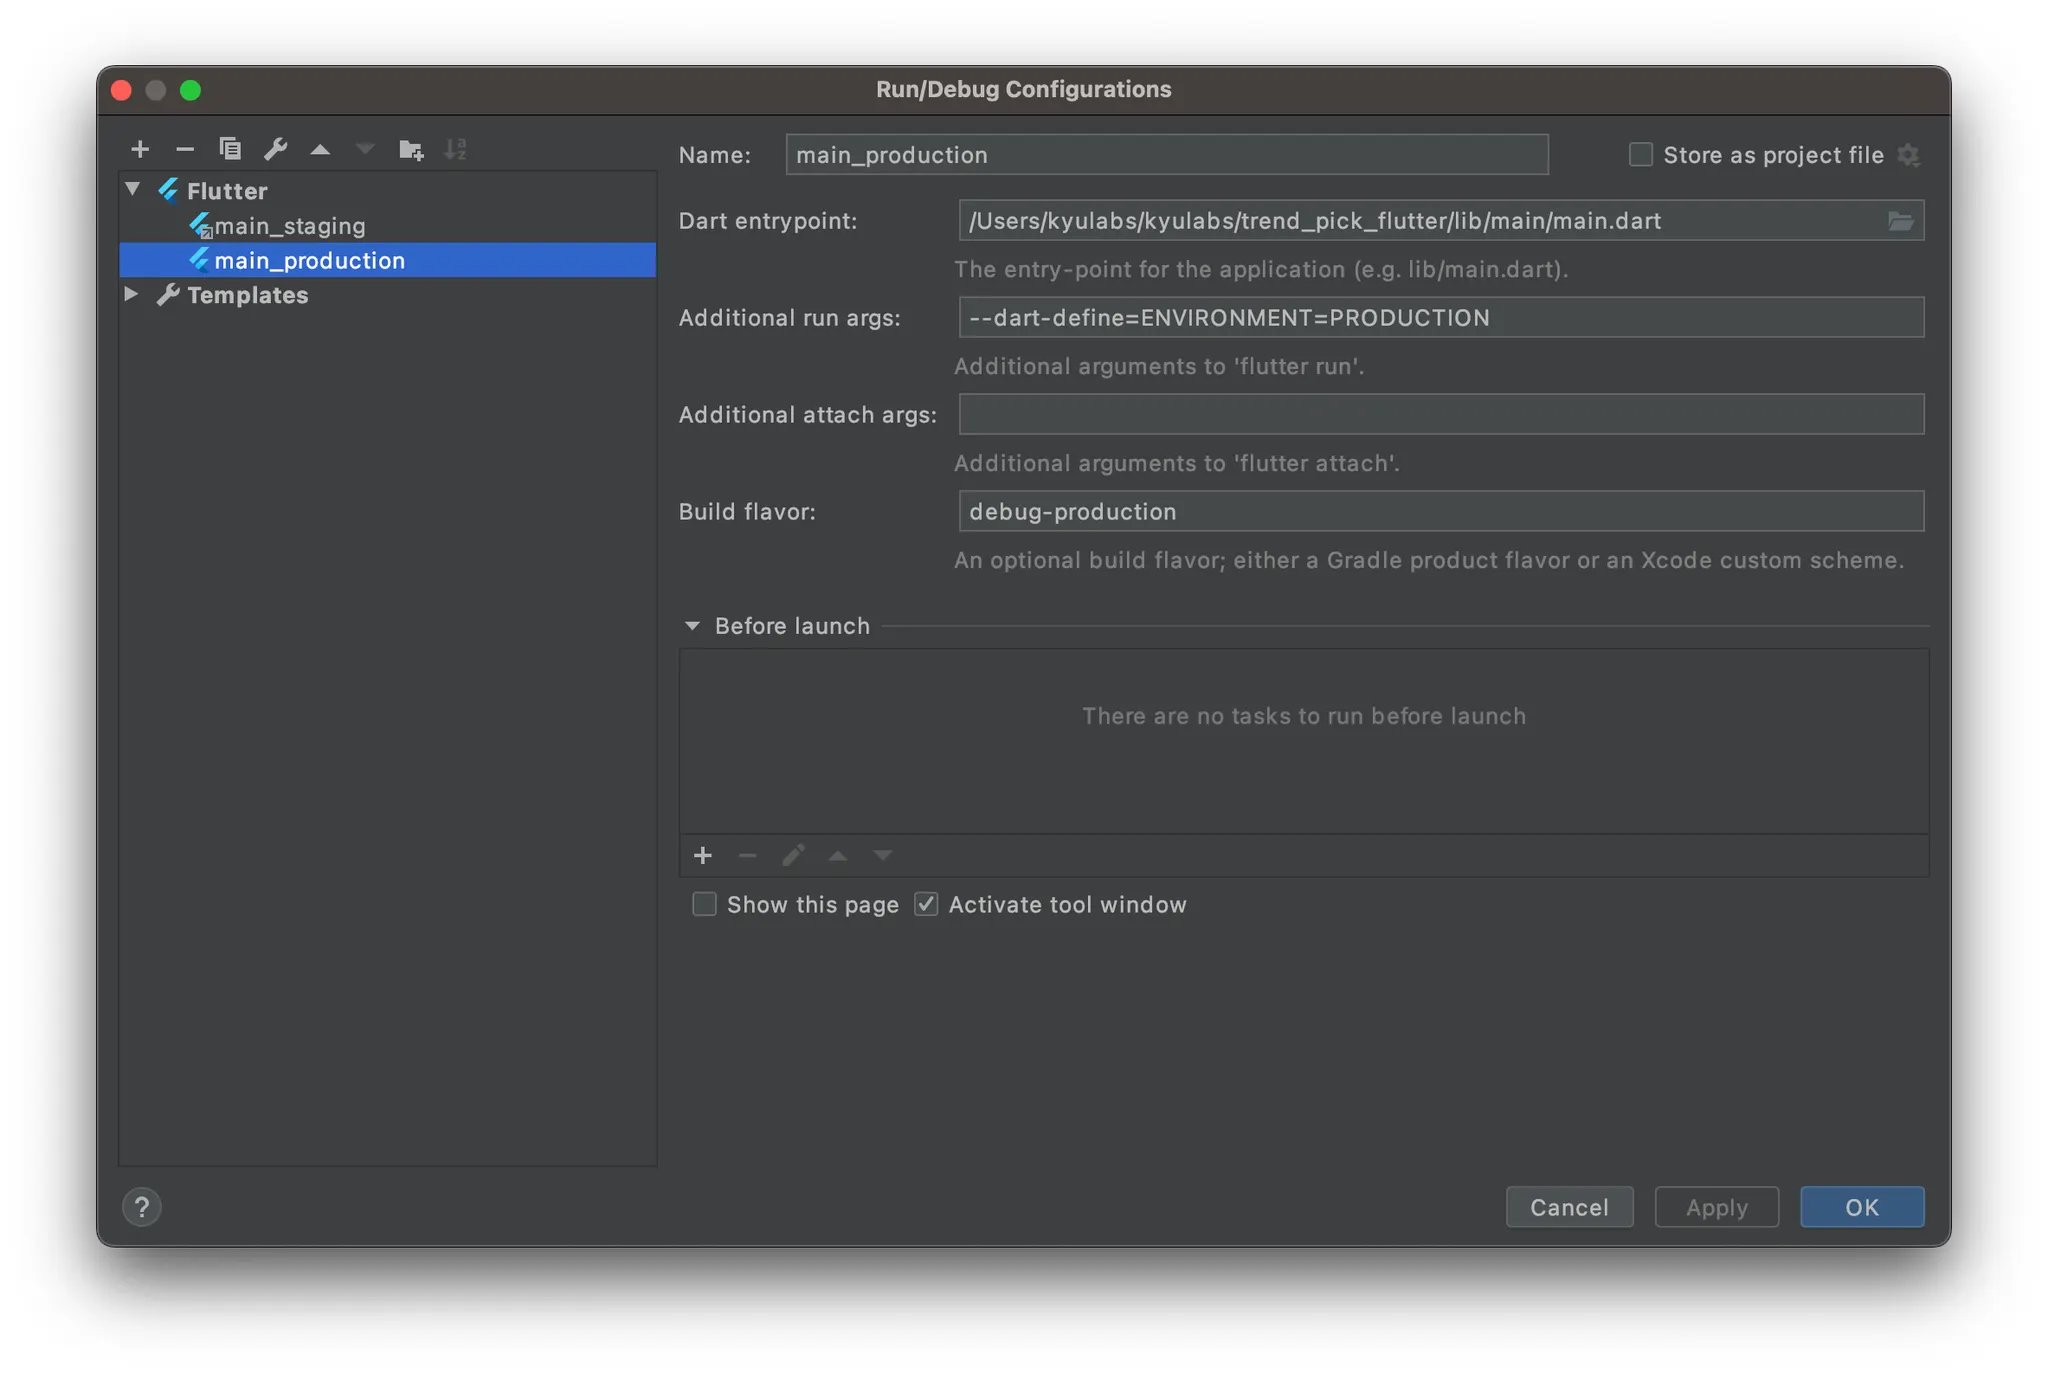
main.dart 파일에서 현재 환경을 코드에 반영하는 로직을 추가합니다.
main.dart
void main() async {
WidgetsFlutterBinding.ensureInitialized();
initializeJsonMapper();
Constants.initialize();
await Firebase.initializeApp(
name: DefaultFirebaseOptions.firebaseName,
options: DefaultFirebaseOptions.currentPlatform,
);
runApp(MyApp());
}
Dart
복사
Flutter 설정 끝.
[Client] iOS프로제젝트에 Staging 환경분리 적용
Configuration 변경/추가
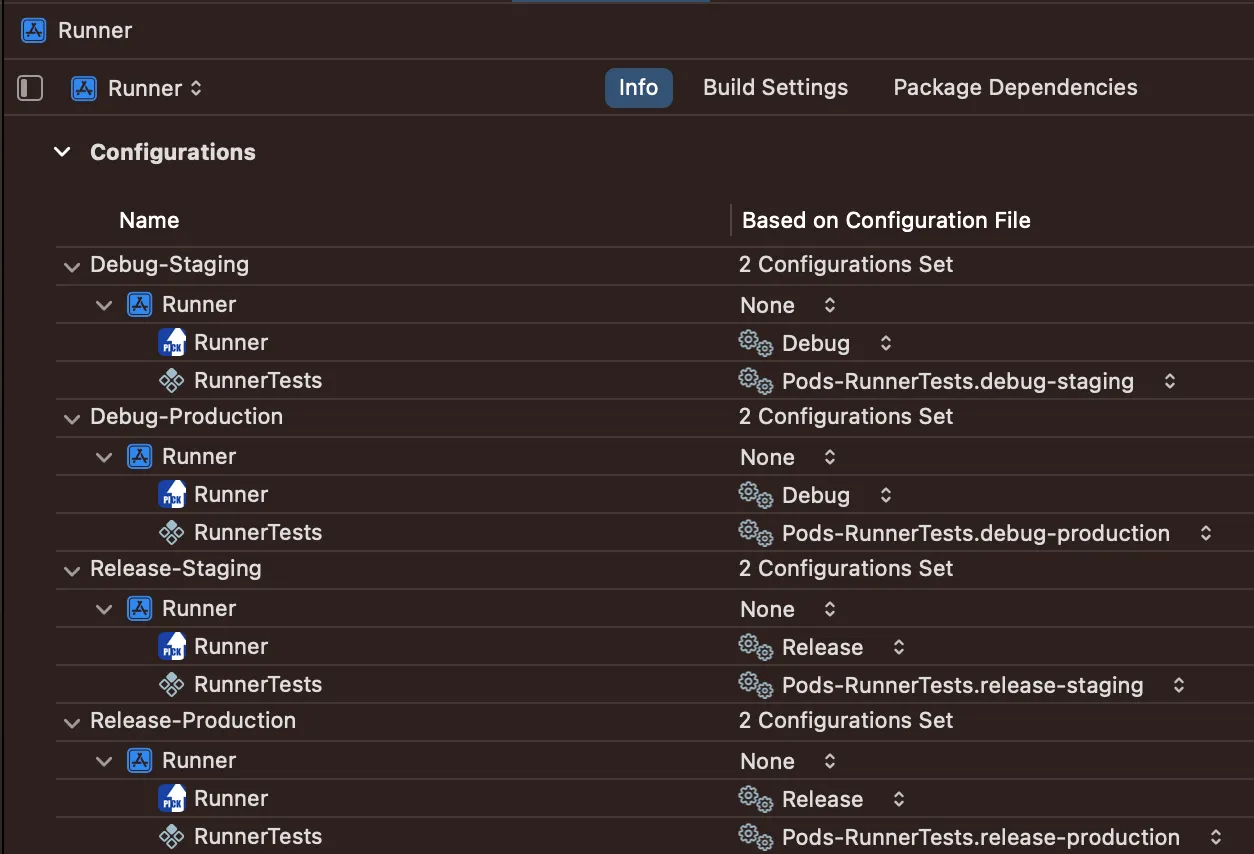
{운영환경}-{빌드타입} 으로 4개의 Configuration을 추가합니다. Profile은 지워도 됩니다.
Debug-{운영환경} Configuration은 Debug, Release-{운영환경} Configuration은 Release로 연결되어야 합니다.
Bundle Identifier 업데이트
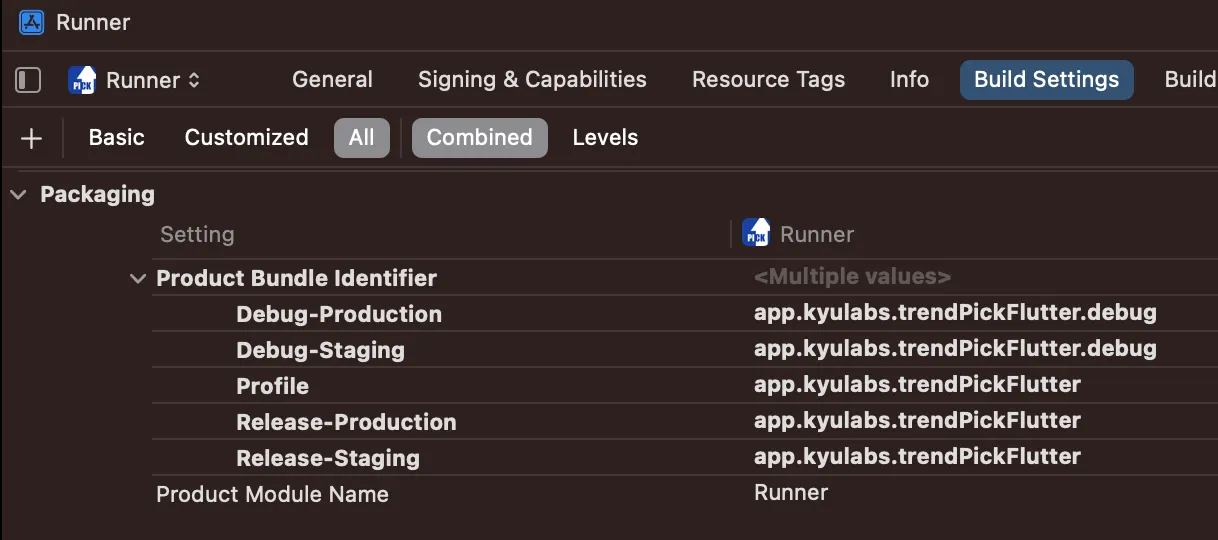
Debug, Release에 따라 BundleIdentifier를 분리하여 작성합니다.
Scheme 설정
•
배포 타입에 따라 Debug, Release 로 구분하고, 운영환경에 따라 Staging, Production으로 구분합니다. 따라서 2 * 2 = 4, 총 4개의 빌드가 나올 수 있습니다.
◦
Debug-Staging
▪
디버깅이 가능한 개발 환경에서 개발 서버를 바라보고 있음.
▪
개발 단계에서 사용됨.
◦
Debug-Production
▪
디버깅이 가능한 개발 환경에서 운영 환경을 바라보고 있음.
▪
이미 배포된 서버 기능을 클라이언트 레벨에서 디버깅이 필요한 경우 사용될 수 있음. 활용 빈도는 높지 않음.
◦
Release-Staging
▪
앱스토어 출시용 배포 앱이 개발 서버를 바라보고 있음.
▪
거의 사용되지 않는 Scheme. 앱스토어 업로드 테스트나 QA전달용 외 사용 가능성 없음.
◦
Release-Production
▪
앱스토어에 출시될 앱. 운영 서버를 바라보고 있음.

위 Scheme 종류를 “New Scheme…” 메뉴로 생성합니다.
“Edit Scheme” 메뉴에서 각 Scheme 의 Configuration을 Scheme에 맞게 변경합니다.

iOS 설정 끝.
android project
google-services.json
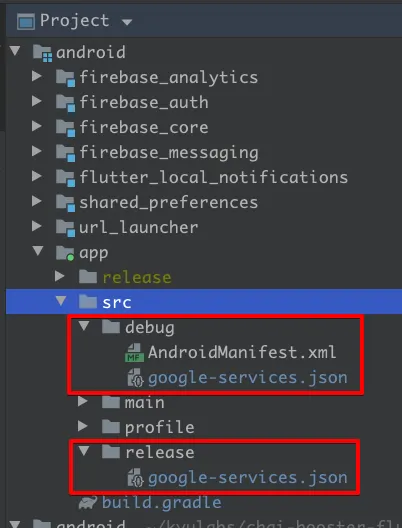
app/src/{flavor}
경로를 만들고 해당 flavor에 해당하는 google-sevices.json 파일을 배치합니다.
🚨 주의 🚨
iOS는 Runner 기본 디렉토리 및에 'Firebase/{flavor}/{plist}' 로 했는데,
Android 는 중간에 Firebase 디렉토리를 두지 않습니다.
Bash
복사
app 수준의 build.gradle 파일
android {
compileSdkVersion 30
... 생략 ....
👇👇👇👇👇👇👇👇👇👇👇👇👇👇👇👇👇👇 android block 의 하단에 넣어주세요
flavorDimensions "envrionment"
productFlavors {
Staging {
dimension "envrionment"
applicationIdSuffix ".staging"
resValue "string", "app_name", "차이부스터 Staging"
}
Production {
dimension "envrionment"
resValue "string", "app_name", "차이부스터"
}
}
👆👆👆👆👆👆👆👆👆👆👆👆👆👆👆👆👆👆
}
Bash
복사
Android 설정 끝.
환경 분리 이후의 배포
위 과정을 거쳐 Debug(Staging), Release(Production) 환경분리를 하면, 배포과정이 조금달라집니다.
iOS
flutter build ipa --flavor Release -t lib/main_prod.dart
Dart
복사
기존 명령어에 —flavor 옵션과 -t 옵션으 추가됩니다.
—flavor: XCode의 Scheme에 해당합니다.
-t: flutter 에서 main 시작 지점 파일을 선택합니다.
flutter 의 환경과 XCode Scheme을 한번에 묶어 빌드하는 과정입니다.